Home Emergency Water Shutoff Mapping Ideas That Help Residents Locate Important Valves During Plumbing Failures
A burst washing machine hose can release hundreds of gallons in an hour. A split line under a sink can soak a cabinet and warp a floor while you are still looking for a torch. You need to know, without guessing, exactly where to turn the water off.
A home shutoff map gives you that knowledge. It is a simple record of every important valve in your house: the main shutoff, fixture valves, gas control, and electrical panel. Making one takes an afternoon, costs very little, and turns a panicked search into a calm routine anyone can follow.
Why Every Home Needs a Shutoff Map
Plumbing failures rarely happen at a convenient time. They happen at night, on holiday, or while the one person who knows the house is away. A map removes that single point of failure. A babysitter, teenager, or neighbour can follow it and stop the water while you talk them through it by phone.
A map also saves money. Damage rises with every minute water flows. Stopping a leak in two minutes instead of twenty can be the difference between drying a room with hired fans, often $150 to $400, and replacing flooring and cabinets for several thousand dollars.
You will also use the map for ordinary jobs, not just emergencies:
- Repairs become easier, because you can isolate one bathroom or appliance instead of shutting down the house.
- Plumbers work faster, and charge for fewer hours, when you can show them where each valve is.
- Seasonal jobs get simpler, from draining outdoor taps to shutting a garden line.
- Rentals and sales go more smoothly, because new occupants can find utilities safely.
Making a map also forces useful discoveries. Many homeowners find valves they never knew existed, valves painted shut, and valves that no longer turn — far better found on a quiet Saturday than under pressure.
The Main Water Shutoff Valve: Your First Priority
If you map only one thing, map this. The main shutoff stops all water entering your home, and it is the valve you reach for when you cannot find a leak. Most homes have two main controls; record both.
The Inside Main Shutoff
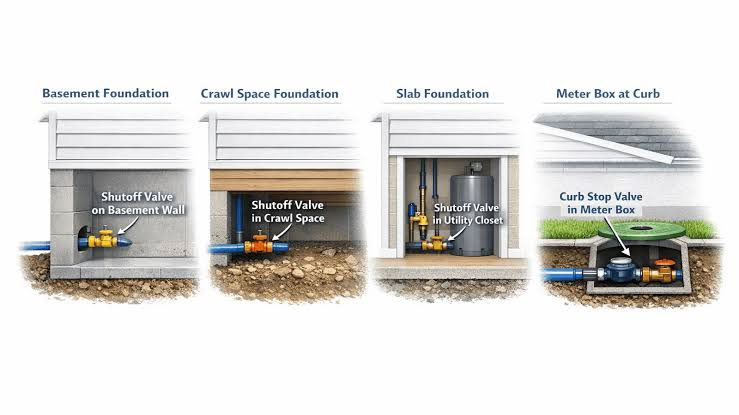
In colder climates, the inside main is usually where the water line enters through the basement wall, often facing the street. Without a basement, check the utility room, garage, or a ground-floor cupboard near the front of the house. In warmer regions, it may sit in an outside box near the meter.
Follow the pipe, not a guess. Start where the line enters and follow it to a wheel or lever near a meter or pressure-reducing valve. Photograph it in context first, so your map shows it as you will see it in poor light.
The Street or Meter Shutoff
The second control sits at the water meter, usually in a covered box near the kerb. You may need a meter key, about $10 to $20, to open it. Rules vary: some water companies allow homeowners to use this valve in an emergency, others prefer you to call them. Note your provider’s emergency number on the map.
Gate Valves Versus Ball Valves
- Gate valves have a round wheel you turn clockwise, often many turns, to close. Older ones commonly seize or leak.
- Ball valves have a lever handle. A quarter turn closes them quickly and reliably. They are the modern standard.
If your main is an old gate valve that is stiff or corroded, budget roughly $200 to $450 for a plumber to replace it with a ball valve. Test it twice a year: close it, open a tap to confirm flow stops, then reopen it slowly.
Fixture and Appliance Shutoffs You Should Record
Local shutoffs let you isolate one fixture while the rest of the house keeps running. That matters when a toilet overflows at midnight. Walk room by room, record each valve, and note whether it turned easily.
Bathrooms and Kitchen
- Toilets: a small handle on the wall or floor behind the bowl. Turn clockwise to stop the tank refilling.
- Sinks and basins: usually two valves in the cabinet below, one hot and one cold, often hidden behind cleaning bottles.
- Showers and tubs: some have access panels behind the fittings; many do not. If yours has none, write that on the map so nobody hunts for one.
- Dishwasher: it normally shares the hot supply under the sink, with its own small valve. Record which valve controls it.
Laundry, Heating, and Outdoor Points
- Washing machine: two valves, hot and cold, usually in a recessed box behind the machine. Note hose condition too, because worn hoses are a top cause of leaks.
- Water heater: a valve on the cold inlet pipe at the top. Closing it is essential before draining the heater.
- Refrigerator ice maker: a small valve, often behind the fridge or under the sink, feeding an easy-to-forget thin line.
- Outdoor taps: an inside shutoff for each hose bib, plus the drain cap position needed for winterising.
- Boiler zones: individual zone valves near the boiler. Label them by the rooms they serve.
Replacement stop valves cost often $8 to $25 for the part, so a valve that spins without stopping flow is cheap to fix now and expensive to discover later.
Gas and Electrical Shutoffs Belong on the Same Map
Water emergencies are rarely only about water. A leak near a water heater or electrical outlet becomes a different hazard. Gas and electrical controls therefore belong on the same sheet.
Gas Shutoffs
Your main gas valve is normally beside the meter outside, and closes with a quarter turn using an adjustable wrench. The water heater, furnace, and stove should each have their own shutoff nearby. Map them all, but write this rule beside them: if you smell gas or hear hissing, do not hunt for valves or operate switches. Leave and call your gas provider from outside. Never reopen a valve the utility has closed.
Electrical Shutoffs
Record your main panel and breaker, plus any sub-panels. Label the breakers serving the water heater, well pump, boiler, sump pump, and kitchen and bathroom circuits, and copy that directory onto your map.
Print this rule on the map: never reach for a valve while standing in water if the area could be live. Shut off power first, from a dry position, or call an electrician. Well owners should also note the pump switch, because closing the main valve alone may not stop a well.
Creating Your Home Shutoff Map, Step by Step
You need no drafting skills or software. A clipboard, a phone camera, and one unhurried walkthrough will produce a map that works. Allow about an hour for an average house.
Step One: Do a Slow Walkthrough
- Start at the meter, then work in order: utility areas, basement, bathrooms, kitchen, laundry, outdoor taps.
- Photograph every valve in context and close-up, showing the landmark beside it.
- Turn each valve gently to confirm it stops the flow. Note any stuck or leaking; do not force them.
- Write down turning direction, turns needed for gate valves, and any tool required, such as a meter key.
Step Two: Draw the Simple Version
Draw one rough floor plan per level, even if rooms are just labelled boxes. Mark each shutoff with a symbol, such as a circled W for water, G for gas, and E for electrical, plus a note: ‘Main water: basement, front wall, blue lever, quarter turn.’ Landmark directions beat compass points, so write ‘behind the water heater.’
Keep the map to one or two pages. A binder nobody opens is less useful than one sheet inside a utility cupboard door. Make three copies: one at the utility area, one with household documents, and one on your phone.
What Every Entry on the Map Should Include
- Exact location, written from a landmark anyone could find
- What the valve controls, and what it does not control
- How to close it, including direction and tool required
- Its condition when last tested, and the date of that test
- Emergency numbers for your plumber and utility providers
Labeling and Accessibility: Making the Map Work Under Stress
A map is only half the system. Valves need labels too, because in a real leak you may go straight to a valve without reading anything. Use waterproof tags or a label maker, not paper and tape, which peel in damp areas. Tags cost a few dollars a pack and should say, in large plain words: ‘MAIN WATER OFF’ or ‘WASHING MACHINE.’
Colour helps, used consistently. Tag water in blue, gas in yellow, and the main shutoff alone in red, so the most important valve looks different. Write the colour key on the map.
Accessibility is where many systems fail, so check it honestly:
- Keep a clear path to the main valve and panel. Do not let boxes or paint tins bury them.
- Store tools with the job: meter key, wrench, torch, and gloves hung beside the map, not scattered in the garage.
- Note any valve reachable only by moving a heavy appliance, so the limitation is known in advance.
- Add a battery torch near the utility area, because a serious leak often means turning the power, and lights, off first.
Review labels and access every six months. A two-minute check while you test the main valve keeps the system honest.
Family Drills and Preparedness
A map nobody has used is a theory. Run a short drill twice a year, timed to something you already do, such as changing smoke alarm batteries. Walk every adult and teenager to the main shutoff and have them close and reopen it themselves. Muscle memory beats reading in a flood.
Make the drill realistic but safe. Pick a scenario, such as a burst washing machine hose, and talk through the order: stop the water, turn off power to the wet area if safe, move valuables, then call for help. Give younger children a simpler job: never touch valves, get an adult.
Share the preparation. Give a copy to a trusted neighbour or house sitter, with your plumber’s number on it. If you rent out the property, leave the map there and walk the tenant through it at move-in. Update it whenever you renovate or replace an appliance, and cross out old entries.
Final Thoughts
A shutoff map is not an impressive project, and that is why it works. It asks for one walkthrough, a handful of tags, and a short practice, and in return it removes the worst part of any plumbing failure: not knowing what to do first. Start with the main valve today. Find it, test it, tag it, and tell everyone where it is. Then build the rest room by room over one weekend. When something bursts, you will stop it in minutes.
Frequently Asked Questions
Where is my main water shutoff if I cannot find it inside the house?
Check the meter box near the street, then the garage and front foundation wall. If you still cannot find it, your water provider or a plumber can locate it; an inspection report often notes it.
What should I do if a shutoff valve is stuck or will not turn?
Do not force it, because an old valve can snap and turn a small problem into a flood. Try gentle movement and penetrating oil on the stem. If it stays stuck, close the main and have it replaced.
How often should I test my shutoff valves?
Test the main valve twice a year and other stops once a year. Note the date on your map. Regular movement prevents seizing.
I rent my home. Is a shutoff map still my responsibility?
You may not be responsible for repairs, but you are the person standing in the water. Ask your landlord where the main shutoff is, record it, and agree who to call. Most landlords welcome the question.
When should I stop trying to handle a leak myself and call a professional?
Call straight away if water is near electrical fittings, if you smell gas, if the main valve will not stop the flow, or if a pipe has burst in a wall. Shut off what you safely can first.